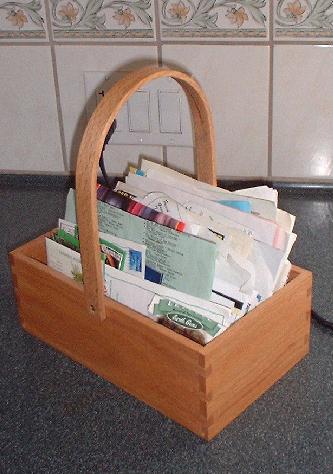
This page describes a project proposed by John Gunterman in 1997 and implemented by several members of the oldtools list. I built six of these as Christmas presents for family in 1997 (the fact that some were not delivered until 1998 just reflects the fact that my shop exists in a temporal anomaly.) Mine were not all identical, but this is one of the early ones - the one I kept. In the interest of simplicity, I will keep all correspondence (included here via cut and paste) in black text, and my inputs in this color. If you have trouble reading this, let me know and I will try something else. Also, note that some of this text will be in a relatively small font. You can use your browser to make it more readable - that's the whole idea of HTML (reader decides what the document should look like). If you really have problems, let me know and I will try to fix it as time allows.
Some messages saved from the shaker tote thread, sometimes called GP (for Galoot Project) II, follow. GP I was a shaker-style bedside table. Unfortunately, I did not save all the messages - perhaps they are in the archive, although John's "creative spelling" (he's dyslexic) might make this a bit of a challenge.
From John Gunterman, 23 Sep 1997:
Okay folks,
I been waiting for things to settle down a bit and now seems like as good a time as any.
In the tradition of the last project, this will be a _SIMPLE_ project requiring _few_ tools and _little_ skill.<Hey, I made one, and didn't even hurt myself doing it, so how hard can it be!?!?!>
The Idea for the next Galoot Project that would make a great gift for SWMBO for the Holidays and she could also use it as the centerpiece-holder for the holiday dinner. Or as a gift for the host/hostess should you be called to a holiday dinner at someone's home.
this project will entail:
The preparation of stock
The cutting of through dovetails
The bending of wood
So without further ado I announce: -The Dovetailed Shaker Tote- My rendition of it can be seen at (alas, a bad link - ken):
http://www.cnh.mv.net/ipusers/gunterman/images/tablej.jpg
(Note the table that it sits upon, the subject of the last Group project ;-)
I'll try to get some plans/dimensions drawn up tonight. unless I can shanghai someone to put together some real plans like last time.
Don't pass on this project for lack having a steam box folks! While it would be a great excuse to make one.... a large pan of boiling water _will_ work.
These REALLY do make great gifts for the holiday season and ARE easy and fun to make.
John
I responded with some questions, which John answered.
>Just for estimating purposes, how long did it take you to make this?
the first time took me from 9AM to 3PM
Stopping for a 1 hour lunch and a 5 Min smoke break ever 1.5 hours
>(OK, the real question is how long would it take you to make the second one?)
the SECOND one took me about 2 hours to make
the third about 1.5 and there it has stayed.
>I can see myself making a lot of these between now and the holidays, so I figure I better try to guess what a reasonable "production run" would be...
if your really cranking them out. "production line style" and are good at dovetails I bet you could probly get 5 done in a good day...... of course you'd still have to wait for the wood to cool and dry, but you could speed that up by placing the whole thing (forms and workpiece) in a slow oven (150 Deg F) for about 4 hours. the most time consuming parts are paring the waste on the tails/pins the next would be making the initial bending jig/form then waiting for the steamer to come up to temp......If you make yourself 3 (or more) jigs and do your bending in batches you will move along quite quickly. (The Shakers were fanatical about efficiency ,afterall.... ;-)
From John Gunterman, 24 Sep 1997:
Subject: GP-II , The cut list
**all stock is 3/8"**
2Pcs. @ 6-1/2" by 4" <short sides>
2Pcs. @ 11-1/4" by 4" <long sides>
1 Pc. @ 11-1/2" by 7 <bottom>
1 Pc. @ 21" by 3/4" <handle>
The material on the original this was patterned after was Poplar. but Basswood is what I have been using since it is harder than clear pine or poplar, cheaper, and works better, IMO. I'll be making the one for this project out of some Soft Curly maple, since I need to use some up. The handle was made from Cherry, and this is what I'll be using (well.. okay, Curly Cherry ;-) However an species that responds well to steam-bending will work.
From Tom Holloway, 24 Sep 1997:
OK, John, we'll give it a shot. I'm assuming the bottom is a bevel-edge panel fit into a groove cut in the sides and ends. Next question: How is the handle attached? Or should I await further instructions?
From John Gunterman, 24 Sep 1997:
Bzzzttt!!!
no not nearly so complicated as all that. it is just a flat piece of wood held to the sides by 2 screws. remember I said _SIMPLE_ though you can certainly take any liberties you choose in the project. if you feel up for it, please do so, (and share with us the process)
> Next question: How is the handle attached?
2 screws on each side. I'll get a clearer picture soon. I think I know where there is one that is not stained yet, that would be a clearer example.
> Or should I await further instructions?
dont have to..... go for it have fun, explore..... that's what these are all about afterall
From John Gunterman, 25 Sep 1997:
well I can report a dismal failure.
I took some pieces of 5/4 Curly Maple out of my stock-pile ad started to walk over the the Neader Buddie to re-saw it in half.... then I stopped myself and said "No this is a GALOOT project, we'll have none of that."
So I set the wood in my vice and grabbed my bow saw.... Hmm how am I supposed to re-saw a board held in a vice w/out the blade binding.... No answer to that one for a while. I decided I would chuck it up in the tall direction and use the bow saw to cut down..... way wrong, ruined stock. Okay re-think this.. maybe I should use a rip saw instead... hmmm.. NO rip saw... got a great X-Cut though... Okey dokey.. lets grab that big*ss backsaw I had Pete file rip for me. cut the boards to approx length and then set about ripping them in half.... kinda squirrely, but I got most of the way through. flipped the piece over and finished the cut. Golly that looks awful!
_Hopefully_ there will be enough stock to plane out all my boo-boo's and still make the 3/8" thickness I'm looking for. Tonight's session will tell.
From Ernie Fisch, 25 Sep 1997:
Hey that's the way I have been doing it. Same results but it does clean up to slightly narrower stock than desired. But it is galoot!
From John Gunterman, 29 Sep 1997:
Okay now that we _all_ have our stock dimentioned ;-) <How's everybody doing w/ that?->
This week We'll discuss the joinery.
The Original has the pins on the short peices and the tails on the long peices. It does nto really matter wich side the pins or tails are on since this is NOT a drawer and is not subject to any lateral forces. So do what you want.
I don't want to start no steekin' HolyWar about wich to cut first, so I'll just say that _I_ do it the ONLY way it should be done, and that is to cut the tails first, unless I cut the pins first.
Once you have the 4 sides joined we will afix the bottom to them the original was merely afixed via four wood screws (total) going through the bottom panel and up into the long sides... trisect each of the long sides and place the screws two screws in each at the 1/3 point.
|----x----x----|

|              |

|----x----X----|
(looking down at the bottoms of the sides)
_predrill_ and countersing for the #6, 3/4" screws...
you now have a simple box usefull for collecting all sorts of sho detritus.
Saty tuned for the next installment making you bending-form
From Sandy Moss, 9 Oct 1997:
I'm coming down the homestretch on John's handled box and need some advice on bending options for the handle. Before assembling the box, I cut a 3/4 x 3/16" deep dado across the middle of the long sides with the nifty #39 I picked up at my friendly auction. Then I cut a matching piece out of the the handle ends and plan to attach the handle in the dado with dowel pins. I've got my form made for the handle. Now for the bending.
a. I'd like to make the steam box I've been wanting, and this is an excuse.
b. I also understand a hot water soak will do the trick as well.
c. I've also heard that a hot water soak can be made more effective by including fabric softener in the water.
Does the porch have any wisdom to share here? I'm using the straightest grain cherry I have for the handle.
From "miket" (I should know who this is), 9 Oct 1997:
I've used a simple steamer for handles and such, which I made from a couple of pieces of 3" galvanized duct, like the type for gas HW heaters. I used a tee and a couple of short pieces to make a horizontal tube long enough to hold the handle piece, and the bottom of the tee (with a short piece) goes in a kettle on the stove. Cut a couple of small notches in the bottom for good water flow. I also put a piece of scrap wood on the bottom because I was worried about staining, but I guess I'm not sure it's really necessary. But I just cover the ends of the pipe with a towel, and away we go! The worst part of the whole affair was SHWMBO laughing over the whole thing! (And to think: the handle was for her berry carrier too. Go figure)
From Tom Dugan, 9 Oct 1997:
The easiest steambox I've seen is the one we use in boatbuilding. Build a long, skinny box from foil-faced foam insulation board, duct taped together. Like Mike, we like to elevate the pieces being steamed with scraps to allow even circulation of the steam. For a steamer, you can use a metal gas can (which has never contained gas!!!) on a hot plate, stove, or propane burner, with a hose running from the spout to the end of the box. Rags stuffed into the top of the box seem to be the universal closure. For smaller pieces like the GP II handle piece I suppose a smaller boiler, like a tea kettle (lose the whistle) will do. I've seen PVC pipe used for the steambox, too.
Steamin's easy, and what it does to wood looks like magic. It's fun!!!
From Tim Swihart, 10 Oct 1997:
That's essentially the same design as Mike Dunbar uses except he went with PVC to minimize heat loss during steaming (it won't conduct away as much of your heat as galvanized duct will). His steamer is presented in a article from American Woodworker (last year if I'm not mistaken). It's a simple two-page article and, having used his steamer myself, it works really well.
If anybody wants, I'll look up the exact issue and page numbers...
From Dan Miller, 7 Nov 1997:
(NOTE: This is in response to a message from me)
>boiling. First lesson: PVC is malleable at 212 degrees F. Just hanging a kitchen towel on each end to keep some of the steam in resulted in some slightly droopy ends of the tee.
Fasten your pipe to a wood base, like a 1x4, and you'll solve the drooping problem. Schedule 80 is better than 40, but 40 should work in a pinch if its all you got. You can also borrow the downspout off your house for steaming in.
>tended to let it form its own "natural" curve. Still, I noticed that some of the wood is splitting out at two points on the bend. This may be because the radius is a bit sharp there. Or, maybe I'm doing something else that could be improved on.
Use a backer - either a sacrificial strip of wood, or (as I use) a piece of 1/8" cold rolled steel from the hardware. The problem is that the inside of the bend is in compression, whereas the outside is in tension. Wood stands up to compression much better, thus the tendency to split along the outside edge. Using the steel strapping or sacrificial wood, you are compressing the outer edge of the bend as well, and will greatly increase your success rate.
The run of the grain is real important too, try to use as straight a grained piece as possible. Air-dried (or green) is best, though I have had good success with KD ash, oak and birch. Cherry should be a fine bending wood as well.
I've found that pre-soaking for 3 nights really helps too.
>All in all, I'm pretty happy with this as a first attempt. Still, I'd like to eliminate the splitting for the production run of handles (all six of them). Any good tips from you experienced steamers out >there?
Use the strapping - that should do the trick for the most part.
>How long should a piece of wood this size be steamed? Is there some rule of thumb?
Rule of thumb is 1 hour per inch of thickness, but I've found 7/8" square stems take about 1hr15min. Note that it is very possible to oversteam as well as understeam. Put some extra blanks in and try them when you think its ready, before bending the good stuff.
>I realize this may depend on species, but I haven't really bought the wood for the handles yet. Since this is an open question, any recommendations for woods that take to steaming better than others?
The oaks and ash bend "like butter" when properly steamed. Cherry should do well too. Even tough to bend woods like mahogany and spruce can be done with proper attention to detail.
You might also consider boiling instead steaming. Its difficult to overboil, and you can have good results taking this approach if steaming doesn't do
As if I could remember 1997...
I made a prototype out of something softer, but ended up using red oak because I wanted the totes and the handles to be the same, and red oak (aside from being cheap) is a good wood for steam bending. All six boxes are essentially identical, but two of them were made with laminated handles (so much for consistency) because I wanted to try this as a technique. Also, I was feeling time pressure to get these done, and steam bending takes longer.
The reason I was running out of time was probably because I was resawing the wood by hand from 4/4 stock. Well, it is supposed to be a galoot project, and I had not yet built my frame resaw (by years). I did set up a production line of sorts, so I was resawing a later tote while finishing up an early one. I think there were never more than four in production at one time, though. Due to waste, the wood on mine ended up a bit thinner than 3/8, but it was always at least 1/4 inch thick.
The long sides were dimensioned to 10.75 x 4 inches, the short sides to 6.5 x 4 inches. I don't remember why mine are shorter than John's, but it's just the way they were made. I like the proportions of the ones I made.
The real difference is that the bottoms of mine float in a groove plowed into the sides instead of being screwed on. This led to the biggest mistake. If you are going to do this, you ought to miter the bottom of each corner instead of just dovetailing it. If you do the latter, the groove will show on the outside. Mitering the area where the groove is located is the easiest solution (other than screwing on a bottom, of course). An alternative would be to make stopped grooves, but this is probably harder. It's best to plan ahead a bit more.
Construction more or less follows the procedures described in the correspondence. Dimension the stock using whatever methods work best for you. Lay out and cut the dovetails. If you are using a bottom like I did, plow a groove for it and remember to miter the bottom of each corner. Assemble the box to test fit the bottom. This is a relatively short box and I wanted to get the bottom as far down as possible - it is pretty much flush with the bottom of the sides. At the same time, the groove can't be all the way to the bottom, or it isn't a groove any more. The solution to this is to make a tongue on the edges of the bottom piece such that it is flush with (or at least near) the uppermost surface. This can be accomplished with a tongue and groove pair (as I did it) or simply by rabbeting the bottom surface of the tote bottom piece, effectively creating a tongue on the top. Remember that you will be working cross-grain part of the time. This may affect your decision as to which method you choose. Once all four sides and the bottom fit properly, allowing for wood movement, take the tote apart and clean up the sides with a smooth plane. Then reassemble, using glue. Now you can work on the handle.
For the laminated handles, they were simply glued up from contrasting wood strips and screwed into the base with brass wood screws. The holes were countersunk so the screw was flush with the outside of the handle. For the steam bent handles, the method of attachment was the same but the preparation of the handles was just a little bit longer...
I will try to recall the process as best I can, and I have some pictures of the jigs to show. Dan Miller's correspondence above talks about some of the peskier details - you should assume that he knows a lot more about this than I do. But this is not a precision task, and whatever works well for you is the right answer. Of course, if you have never done it before, it helps to know how the problem has been solved in the past.
Let's just say there are two parts to the problem: getting the wood wet and getting the wood dry again.
The first part of the problem requires some form of steaming box. The one I used for this project was made from PVC pipe, since the item to be steamed was long but had a very small cross section. The pipe is made in a T shape using standard PVC cement. If you can find PVC pipe with thicker walls (a higher schedule number), you might want to consider it despite additional cost. The thicker it is, the less likely to droop under heat.
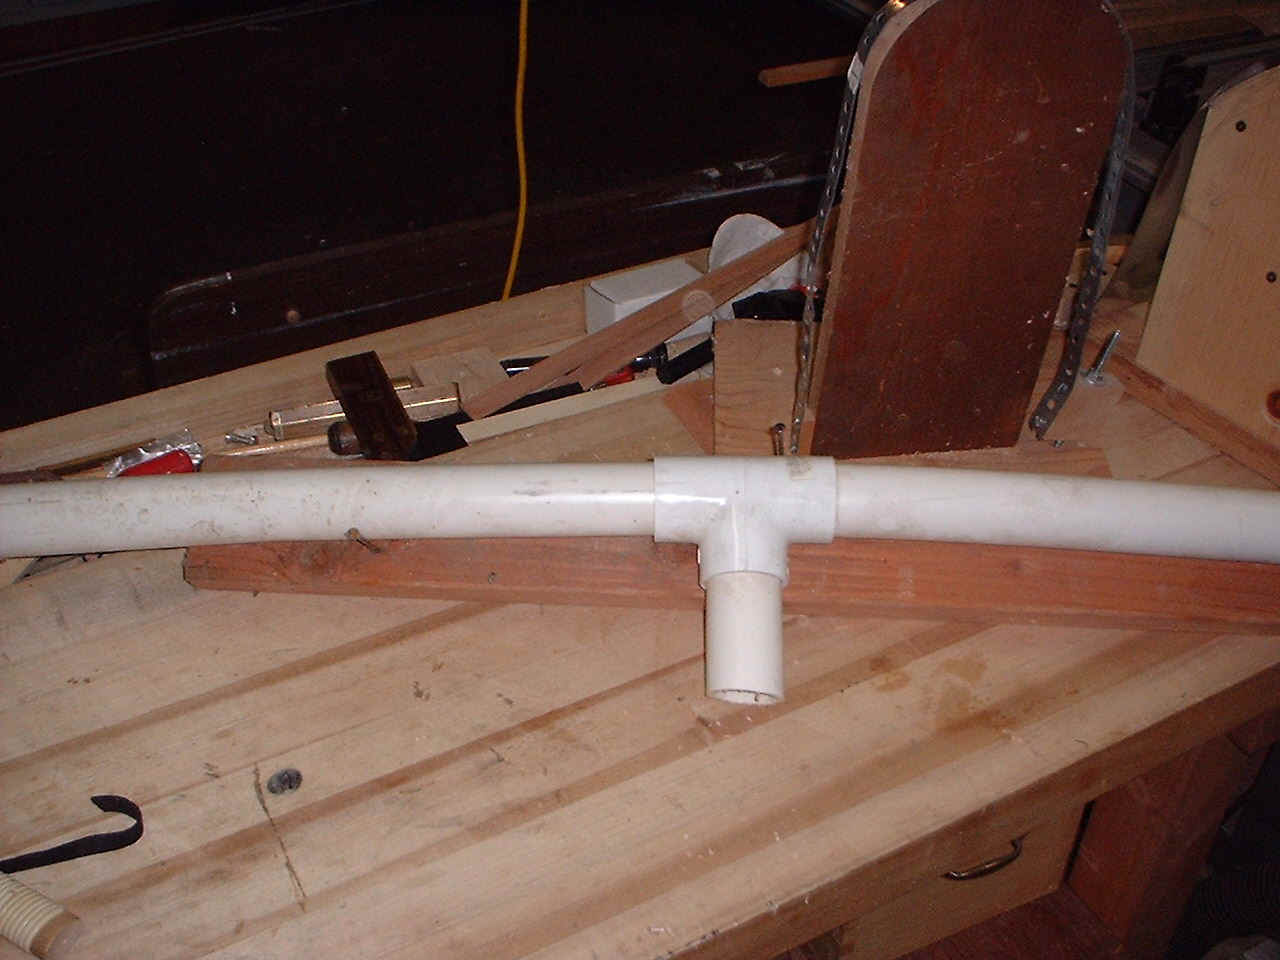
Note that this is mounted on a board to solve the drooping problem.
I generally try to presoak the wood for a couple of hours in the bathtub (or something else if you have a container long enough - the handles are fairly long before they are bent). This seems to help.
In use, I take a big stockpot and set it on the stove with some water in it - a couple of inches is sufficient. I have a lid made of masonite, in which a hole the diameter of the PVC pipe is cut. I put the lid on the pot when the water is starting to boil and insert the short downward stub of the pipe through the hole. I usually stuff a rag tightly in one end to direct the steam the other way. Then I insert the object to be steamed and cap the end with another rag, a bit looser to let the steam escape a bit. Over time, these will be pretty wet, so take steps to deal with the drips that will come off the ends of the pipe even with rags in them. They will probably just fall on the stove if the pot is big enough, but note that this jig is about three feet long and tends to be wider than most stoves.
It can be somewhat a somewhat messy process, as a good deal of steam is generated. My wife is pretty tolerant and likes to participate, but I can easily see that others may not like to see such a mess in their kitchens. If you have the facilities to do this in your shop or outdoors somewhere, it might be a good way to avoid conflicts. A propane-powered camp stove or something similar would work about as well. Also, I hate wallpaper and generally keep it out of my house, but if you have wallpaper in your kitchen there might be some serious side-effects of generating this much steam for such a long period of time.
It takes 20-30 minutes to steam a handle. When it is done, you need to move it to the bending jig fairly quickly and get everything tightened down while it dries out - which is, of course, part 2.
For the drying phase, you need to hold the bend in place on a jig of the proper shape. They are not hard to make, and the wood (if the correct species and thickness) should bend fairly easily with a couple of pounds of force when it is good and wet. It also should not split on the outside of the curve, which would indicate that it was not quite ready. So what is this bending jig like?
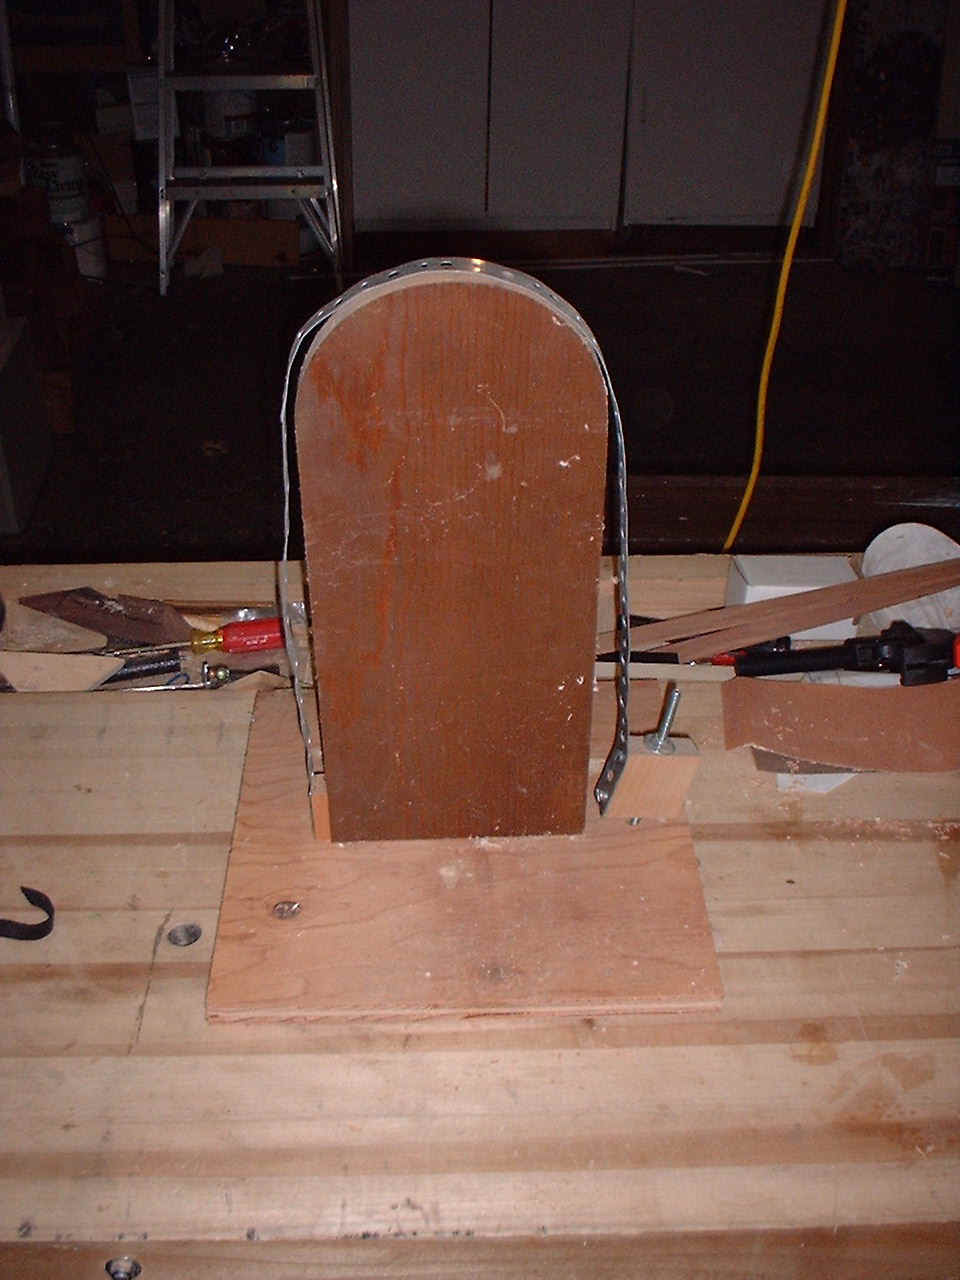
Well, it consists of a core cut round on one end in the shape to which the handle will be bent. The width of the core should be equal to the inner diameter of the handle, which is the same as the outside width of the box (i.e., the length of the end pieces, as the handle mounts to the outside of the box). A piece about one inch thick will do as base material, and can be anything you have around the shop. Mine is some generic softwood. The core handles the inside of the bend, which is under compression. The other part of the jig - probably the important part - is a steel strap, conventionally made of plumbers strapping tape. This goes around the outside of the bend which is under tension. It just wants to be straight, and the fibers will split if nothing is there to prevent it. That's the job of the strapping tape. It holds the fibers of wood in place as the wood dries and resists the natural tendency to split outward. It gets ugly if you don't have one of these. Trust me.
Of course, you need to get the handle onto the core, bend it, get the strap around the handle, and tighten it down fairly quickly. Don't panic, just work steadily and deliberately. This would be a bad time for a break. The jig is designed to facilitate this process - the strap can be quite loose and pushed out of the way during the initial bending, then moved into place and adjusted quickly. How? The core rests on a base, and is attached from the bottom with screws. One side of the strap is fixed and is simply screwed to the side of the core near the base. The nice thing about using strapping tape is that it has holes already in it. This does not seem to matter as far as preventing splitting. I made a spacer the same thickness as the handle, so the end of the strap is held out from the core by the same amount as the thickness of the object to be bent. The strap then goes over the top of the core and attaches to a block of wood. The block of wood has a hole drilled through it and rides on a long bolt that comes up through the base. The bolt is positioned so that when tightened, there is about the same gap on both sides of the core. This is the thickness of the material to be bent, as described above.
A hex nut above the block on the end of the bolt secures it in place. When loading the jig, I back the hex nut all the way to the end of the bolt and push the strap aside. When the handle is positioned in the jig, I grab the block and pull it down sharply to "capture" the handle in place. With my other hand, I spin the nut down to the block. I can then add more pull on the strap as necessary by pulling down the block with one hand and tightening down the nut with the other. It helps to have more than two hands during this procedure, generally achieved by having an assistant.
After a day or so, the wood will be dry enough to remove it from the jig. It will spring out a little, but still be flexible enough that the two brass screws will hold it on. So far, there have been no problems, and these have been in place 4.5 years.
There are alternatives to plumber's strapping tape, and since it is commonly available only in the one inch width in the US, you may find you need to experiment a bit. Darrell LaRue has used the metal strapping used to secure lumber during shipment; it is about 3/4 inch wide. I bought some four-inch roof flashing (the galvanized kind) to bend some wider stock. This also required a new steam box, as the PVC pipe will only take small diameter stock. Lee Valley sells two-inch strapping tape for steam bending, but I have not been able to find it in local hardware stores. You won't need it for this project, but once you see how easy it is to bend things, you will see new opportunities for curved surfaces in your designs.
You can use any finish you choose on these. I can no longer tell if I finished them at all, but if I did it was likely to be in my oil-based finish period. Probably 1/3 tung or linseed oil, 1/3 varnish, 1/3 turpentine. This finish does smell for a while, so you might want to let things air out before giving these away to your relatives. You could use shellac, which might be a bit glossy. Also, it depends on what you choose as wood - it looks better on some than on others. If you are going to use a finish, consider finishing before glue-up. I build a lot of boxes, and it is a bit of a pain to do the insides once assembled.