Wood: uncertain
Finish: Shellac
Anyone can make a square box. Not enough of a challenge for me, though.
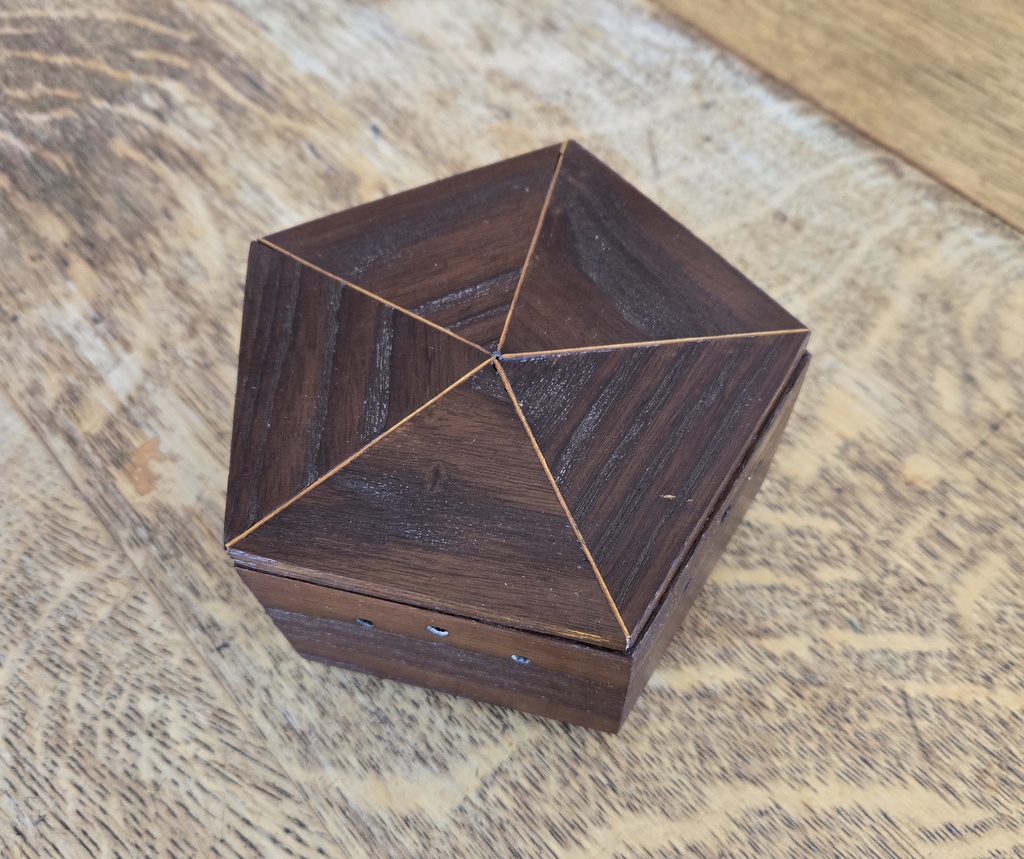
One of my older box-making books has a number of fairly interesting designs - among them a pentagonal box and a potpourri box. So for Christmas 2025, I decided to combine these two into one as a gift for my wife. I clearly needed to modify the plans to combine them, and we spent a good deal of time discussing what she wanted it to look like.
I went down to my local used wood retailer (Raleigh Recycled) and wandered around looking at all the suitable pieces of wood - not too big, interesting color and grain, etc. I found something workable and brought it out to the lobby. Normally, the woman who runs the front office knows what I bring her to write up, but she really had no idea what this one was. Not a problem, but hard to explain. The box is made almost entirely from that board, but I added some light colored veneer I had in the shop as a contrasting star pattern to the top to add some visual interest.
So, what makes something be a good potpourri box? The box in the book had holes in various surfaces to let the fragrence out (which is the whole point) but we decided that a hole pattern in all the sides would be sufficient. So, the top and bottom (just a piece of thin plywood that no one will see) are still solid.
Now we move on to understanding how to build an "n-sided" box. I have done this before, and there are formulas that you can use. But being a former math major, I really wanted to understand the geometry behind such a project. Once you learn it, you can use the analysis to some up with the appropriate angles for any number of sides. So, time for a geometry lesson. The top of the box is made of triangular wedges. Figuring out the angles for these is pretty obvious: (angle = 360 / n) or 72 degrees for n = 5. But the more interesting question is: what is the angle for the sides of the box? Ahh, more to it. As it turns out, the starting point is the last answer. Think of the solution as dividing each top wedge into two right triangles by drawing a line from the center point - where the triangles join - to the middle of the outside edge. (You don't draw it or cut it, you just think about it.) So, for our five-sided box, the resulting triangles will be 36 degrees (72 / 2) at the pointy end. It's a right triangle, so while any triangle has 180 as the sum of the angles, you just have to subtract the answer (36) from 90 to get the remaining angle: 54 degrees. And that's it - the sides of the box have to be cut at a 54 degree angle to form a pentagon. You can use this approach to make a box with any number of sides, and I will probably do a hexagonal one next.
The pieces are all about 3/8 inch thick. Most of the prep work was done by hand since I no longer own a power planer (miss it sometimes, though). I did use a table saw to cut the angles. One of the tools I acquired a couple of years ago was what Lee Valley calles a "digital protractor." It is, of course, no such thing. What is it really? A bevel gauge with a digital readout. It sat in a drawer of my workbench for a year since I could not figure out what it was good for. Now I know. It's brilliant at both measuring angles and at setting the bevel guide of a table saw to within a tenth of an inch of the desired angle. Everything just fits and does not need any tune-up work on the angles.
I made five rectangular pieces for the box sides, and five triangles for the box lid. The box sides were pretty easy, and everything just got glued up using some very thick (and long) rubber bands to act as clamps. The box body has five (of course) feet made from small blocks of the same wood. The book design does this because it has holes in the base of the container to let out fragrance - which we decided not to do. It still looks good with the feet. The bottom of each side has a notch to receive the box bottom. I cut out a pentagonal piece of 1/4 inch plywood to be the bottom, then glued up the box itself, the bottom, and the feet.
The top is much more of a challenge. It consists of five triangles that must fit together exactly, with a thin piece of veneer in the middle of each joint for appearance sake. Each triangle also has a notch on its bottom outside edge so the lid drops slightly into the box body. There was really no easy way to glue this all up, so it was done a little at a time. Final trimming was done after glue-up. The exterior of the box body and both surfaces of the lid were cleaned up with fine sandpaper after everything was known to fit together.
Then, on to the usual uncountable coats of shellac (here, garnet) to build up a polishable finish. Then, rub it out with pumice and rottenstone and wax it. There's no finish on the inside, though. It might interfere with the scent of the potpourri at first.
![]()
![]()