 First
off, by handsaw, we mean hand powered saws, not hand held saws. Anyone looking
for electrically powered tools is in the wrong place.
First
off, by handsaw, we mean hand powered saws, not hand held saws. Anyone looking
for electrically powered tools is in the wrong place.First
off, by handsaw, we mean hand powered saws, not hand held saws. Anyone looking
for electrically powered tools is in the wrong place.
Secondly, I do not claim to be the world's greatest expert on this subject. I merely have collected a reasonable amount of knowledge on the subject, and I know how to write and present information reasonably well (I used to be a technical writer). Also, I believe that the primary purpose of acquiring knowledge is to use it, but the secondary purpose is to pass it on to others. You can't take it with you. If there is an afterlife, I don't expect to be sharpening any saws wherever I end up (heat treating, perhaps).
That said, it's a bit difficult to understand where to begin. There are many ways to approach the subject, and this web page is intended to be a general treatment on the subject. Those interested in more specific details have other resources, and I will try to point some out later. Here you will get a good general understanding of hand powered saws, but there are so many ways to divide the subject that it becomes a bit overwhelming. Rip vs. crosscut? Western vs. Oriental? Backsaws vs. other types? General purpose vs. special purpose? You see the dilemma - a taxonomy of saws could be produced in many different ways. So I will tend to focus on groups of saws and try to break things down within categories.
Look at a saw catalog from 1900 and you will see many types of saws. No one person owned one of each, and probably no company engaged in producing items from wood owned examples of anyone's complete line. The reason so many types exist is that saws were used by different professions. A saw used by a carpenter has different requirements from a saw used by a cabinet maker, and certainly very different from a lumberman. A good saw for general use might be used by a farmer or a homeowner, but many saws were specialized to the needs of different trades - and different individuals working in those trades. Thus, the saw maker had to have a very broad line if he wanted to cover the entire market. But a prospective buyer would only be considering a small percentage of the saws in the catalog.
Finally, while this is not intended to be the last word in understanding saws, I am always interested in improvements, and would welcome comments, suggested improvements, and constructive criticism via email to me (kfg_at_calast.com). Also, it's a work in progress and will be expanded in the future.
Let's begin.
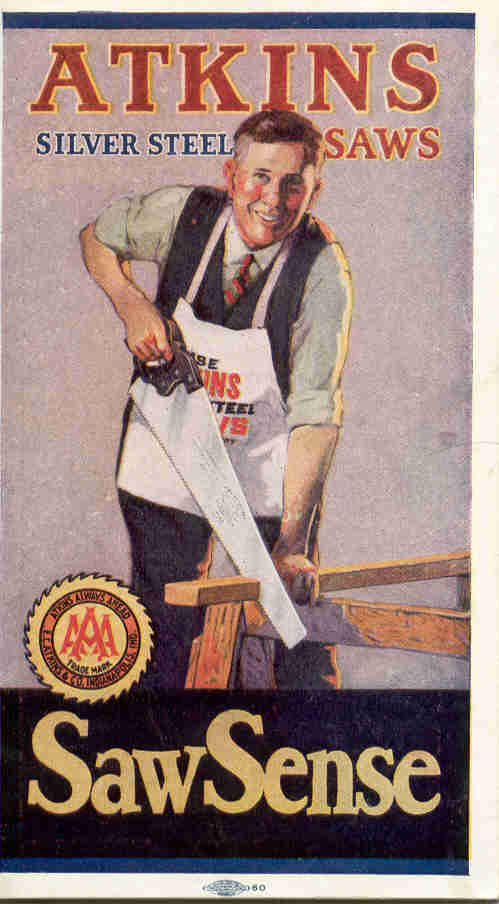
In this section, we will discuss a group of saws that are familiar to almost everyone in Europe, North America, and most of the world colonized by Europeans. When you ask a child in America or England to draw a picture of a saw, the result will probably be a good representation of a Western style handsaw. Mostly trapezoidal in shape, narrower at the tip and wider at the handle, teeth on the bottom, and no back. Look at the above picture, with the smiling fellow in vest and tie.
In fact, in common usage in countries where these saws are used, the term handsaw is used to describe saws without backs, and it is understood further that these saws cut on the push stroke rather than the pull stroke. Because of this, they tend to be "sturdy" and made of fairly thick steel, at least as compared to backsaws. They come in any number of lengths, but generally have either a rip or a crosscut tooth shape. Manufacturers offered many variations, reflecting different "price points" in their product lines. Presumably, the more expensive saws were better made, but even the journeyman carpenter just starting out needed decent tools - he just couldn't afford the top of the line product.
At this point in our discussion, we need to take a slight detour to discuss the nature of wood and how it is cut. It appears here only because this is the first type of saws we are discussing, but it is applicable to all saws and you might wish to either understand it as thoroughly as you deem necessary at this point, or else remember where the information appears in case you need to refer back to it.
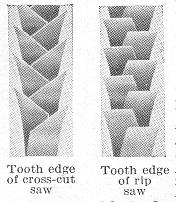
Wood structure is often described as a bundle of soda straws, and this is a rather good analogy. There are multiple tubes running in parallel with the grain. If you held an actual bundle of soda straws in your hand and though about cutting them, you would soon realize that separating them (what cutting really is) is quite different if you wanted to do it lengthwise or crosswise. Hold the straws in one hand and grab about half with the other hand, pulling them apart. Now put them back together and think about splitting that bundle in half the other way - so that each hand had the same number of straws but the straws were only half as long. Of course, in wood the straws (OK, cellulose tubes) would be glued together with lignin so separating them lengthwise is not quite so easy, but you can see that it is a fundamentally different operation. So it is with sawing. Cutting along the grain is called ripping, and cutting across the grain is called crosscutting. Ripping is accomplished fairly easily with a tooth shaped like a little chisel that makes a narrow path between the tubes. But in crosscutting, you need to sever the fibers and need something shaped more like a knife, with a bevel. Compare the tooth shapes in the picture at right. Since rip teeth are shaped differently from crosscut teeth, and there are different saws to do these different jobs.
 It
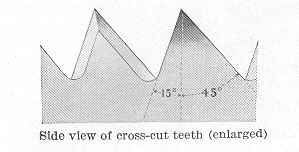
might also be useful to note that the rake angle - the angle the front edge of
each tooth is offset from a right angle to the line of teeth - is much smaller
in your typical rip saw, perhaps only five degrees. Thus, the front of each
tooth appears almost vertical, and the saw if filed straight across so that the
front of the tooth is flat. Crosscut saws have more rake, usually about 15 or 20
degrees. A close examination of each tooth will show bevels from the filing on
every other tooth when viewed from one side of the saw. The alternate teeth show
bevels when the saw is viewed from the other side.
It
might also be useful to note that the rake angle - the angle the front edge of
each tooth is offset from a right angle to the line of teeth - is much smaller
in your typical rip saw, perhaps only five degrees. Thus, the front of each
tooth appears almost vertical, and the saw if filed straight across so that the
front of the tooth is flat. Crosscut saws have more rake, usually about 15 or 20
degrees. A close examination of each tooth will show bevels from the filing on
every other tooth when viewed from one side of the saw. The alternate teeth show
bevels when the saw is viewed from the other side.
In most jobs, the grain runs the "long way" on the board. Thus, cutting a board to width is a ripping operation along the grain, and cutting a board to length is a crosscut operation, across the grain. Angled cuts are a bit of both, and crosscut saws are the better choice here. It is possible to rip with a crosscut saw, and if you could only have one saw this would be your choice. It is very difficult to crosscut with a rip saw, since the lack of a bevel prevents you from effectively slicing through the fibers. Still, it is useful to consider the angle being cut. Dovetailing is mostly with the grain, and so dovetail saws are traditionally filed rip.
Back to handsaws, a catalog from the days when handsaws were the only choice shows many lengths as well as the various tooth configurations. Why so many? There are two answers here. First, there are many different sizes of woodworkers. A woodworker with longer arms will be more comfortable with a longer saw; it's all about "arm throw." The second answer is that there is a need for smaller saws to go in portable toolboxes. You can use these even if they are too short for your normal arm throw, and they are much easier to carry. Traditionally, a small handsaw was carried in the lid of a portable toolchest.
What exactly is arm throw? This is your natural arm motion when sawing, and is easily determined. It helps to have an assistant with a measuring device (yardsticks work nicely) but you can do it yourself. Stand a few feet away from a wall. Make a fist and extend your arm in front of you, then move forward until you touch the wall. Now, bring your arm back (bending your elbow) until your hand is lined up with your shoulder. Measure the distance from your fist to the wall. Add a few inches to this number, as you don't want the tip of the saw coming completely out of the kerf. (The kerf is the groove cut by the saw.) The result is the most natural blade length for you. In my, case, the distance is about 24 inches, so a 26 inch saw blade would be the one I should buy. I can certainly use a shorter one, and do at times. I could use a longer one, but wouldn't use the extra length for anything much.
A word about panel saws is appropriate at this point. A panel saw is a shorter handsaw designed for toolbox use, as noted above. Panel saws have traditionally been made with finer teeth than handsaws. Presumably, this is based on the idea of a portable toolkit for job-site use. A finer cut is going to be easier to deal with than one that is too coarse, so more teeth are the right direction here. The saw will cut a bit slower, but it's a better trade-off to make slower but cleaner cuts as opposed to faster but coarser ones. Typically, panel saws are 24 inches and shorter, and are at least nine-point saws. Panel saws are almost certainly filed for crosscut work as it is more versatile.
 Well,
we've just thrown in some complications here, so it must be time to talk about
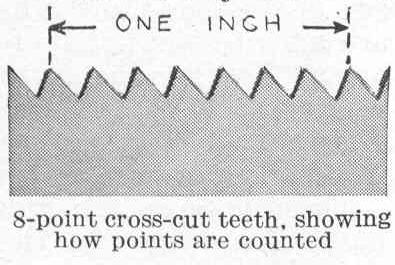
points. The points in question are of course the points of the teeth, and are
one way of measuring how many teeth are in a given inch of saw blade.
Unfortunately, there are two systems - TPI (Teeth Per Inch) and points, and they
are just off enough to be confusing. Points are preferred because
handsaws are stamped with a number representing points, so it's pretty easy to
just look at your saw if it is marked in this way. So what's the difference?
Consider a saw you find at a yard sale. You have a ruler with you and you line
it up to count the number of teeth in an inch. You note that when one tooth
lines up exactly with an inch mark, there are six more teeth in between the inch
marks and another that lines up with the next inch mark. Thus, you have eight
points included in the given inch, counting the ones at both ends. Isn't that
also eight TPI? No, because technically the last tooth belongs to the next inch,
just as the first tooth belongs to the this one. So it's eight points, but only
seven TPI. It's a bit hard to get used to, but after a while it becomes quite
intuitive.
Well,
we've just thrown in some complications here, so it must be time to talk about
points. The points in question are of course the points of the teeth, and are
one way of measuring how many teeth are in a given inch of saw blade.
Unfortunately, there are two systems - TPI (Teeth Per Inch) and points, and they
are just off enough to be confusing. Points are preferred because
handsaws are stamped with a number representing points, so it's pretty easy to
just look at your saw if it is marked in this way. So what's the difference?
Consider a saw you find at a yard sale. You have a ruler with you and you line
it up to count the number of teeth in an inch. You note that when one tooth
lines up exactly with an inch mark, there are six more teeth in between the inch
marks and another that lines up with the next inch mark. Thus, you have eight
points included in the given inch, counting the ones at both ends. Isn't that
also eight TPI? No, because technically the last tooth belongs to the next inch,
just as the first tooth belongs to the this one. So it's eight points, but only
seven TPI. It's a bit hard to get used to, but after a while it becomes quite
intuitive.
Now we know that saws came in different lengths because users have different arm throws (or tool chests), but why so many different numbers of points? Again, we go back to the idea of how a saw was used. In general, saws with fewer teeth cut faster but not as cleanly, and saws with more teeth cut more slowly but leave a cleaner edge. There are many reasons why you might want fewer or more teeth.
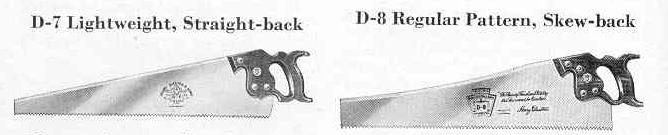
One other variation that ought to be mentioned is that some saws are skewback (i.e., have concave backs) and others are straight-back. The idea seems to be that there is less saw to move through the kerf with a skewback saw, and they tend to be lighter and easier to carry around. A straight-back saw has more stiffness but is heavier. Mostly this is just a matter of preference.
The obvious difference between these saws and the handsaws described above is that they have either steel or brass backs. (Early ones might also be found with iron backs.) Why do they have backs? Simply put, they are made of thinner steel to leave a narrower kerf, and thus require a back to provide added stiffness. As with the handsaws, Western backsaws cut on the push stroke. Think about pushing a rope as opposed to pulling one - since the rope has no stiffness, you can't really push it but you can pull it. Something rope-like in shape but with more stiffness (drill rod, perhaps) can easily be pushed. Thin saw blades intended to be pushed need the extra stiffness provided by the back to be effective. You might note that Japanese saws are also thin but most don't have backs. This works because they are used on the pull stroke, keeping the blade in tension rather than compression. Thus, flex is not really a problem.
As with handsaws, some backsaws are filed for crosscut work and some are filed for ripping. It all depends on the job for which the saw will be used. They also come in many different sizes. Unlike handsaws, this has less to do with arm throw than with application. The specific names applied to backsaws mostly have to do with length, but also with how the teeth are shaped and how thick the blade is. In general, it's OK to use the term backsaw for any of these, but a more selective name can help pin down just what you have in front of you, or to identify what someone else is discussing. Unfortunately, these names have not been consistent through time.
At first, one could simply measure the saw blade and assign it a name based on the length. If you did so, you might end up with a list somewhat like this.
Dovetail saw 6"-10"
Carcase saw 10"-14"
Sash Saw 14"-16"
Tenon Saw 16"-20"
These numbers and names are based on Holtzapffel's Volume II (1846). This nomenclature is generally in agreement with Joseph Smith's 1816 work Explanation or Key to the Various Manufactories of Sheffield, although there was some shifting of the boundaries between the sizes during the time period between the two works. It is unlikely that any two sources would ever agree exactly, but we can see that the general pattern holds, at least during the 19th century. The inventory of the Seaton tool chest (1797) also follows this pattern, with saw lengths of nine, 11, 14, and 19 inches for the four classifications.
Note that there are overlaps in some sizes, and that modern usage may differ somewhat. There are modern makers (Tom Lie-Nielsen, for one) who sell short backsaws and call them tenon saws. This isn't "wrong" but rather a reflection of how the term is commonly used now. While usage does change over time, the term tenon saw would have been understood in colonial times - or today in the UK, for that matter - to refer to a larger saw. This is, in fact, a very old term. Moxon refers to the "tennant-saw" in the 1678 Mechanik Exercises; he explicitly states that the tennant-saw, being thin, has a back.
Besides, an examination of more contemporary literature distributed by the saw makers shows this "naming by length" to be too much of a simplification. There are clearly different saws with similar lengths that had quite different purposes. For example, the 1936 Disston Saw Tool and File Manual shows that the No. 4 backsaw was available in lengths of eight through 16 inches. In addition, the No. 4 Mitre Box Saw was available in 18 to 30 inch lengths. But the same page also shows the Nos. 68, 70, and 71 dovetail saws in lengths from six through 12 inches. So there is overlap in the range eight through 12. You need to look beyond length and consider other attributes, such as the thickness of the blade and the number of teeth per inch. The dovetail saws all had thinner blades (.018 inches) and more teeth (17 points) than what Disston called backsaws. Handles are also somewhat different, but cannot be considered that reliable a guide across different manufacturers. Just because Disston used either inline turned handles or open handles for dovetail saws and closed handles for all other backsaws, this does not mean that all makers did. But for this one manufacturer, it is clear that a ten-inch long No. 4 backsaw was not considered a dovetail saw by Disston, and it would be incorrect to call it by that name. Instead, it is just a small backsaw.
It is also fairly clear that most backsaws are intended for cross-cutting operations. Ripping a long board is just about impossible, as the back interferes. The one exception to this is dovetailing, where the depth of cut is short. Since hand dovetailing is essentially a ripping operation, dovetail saws must be filed with rip teeth to saw cleanly between the wood fibers. Making tenons for mortise and tenon joints requires both cross-cutting across the fibers for sawing the shoulders and ripping to form the cheeks. (The cheeks can also be split off using chisels, which some jointers preferred.) But most back saws were filed cross-cut for this purpose. While Disston does not explicitly address the tooth shape when discussing No. 4 backsaws, it is probably safe to assume these were filed crosscut, as the larger miter box saws would have been. A bench hook is suggested for use of these saws, and this is a good indication that these were crosscut saws.
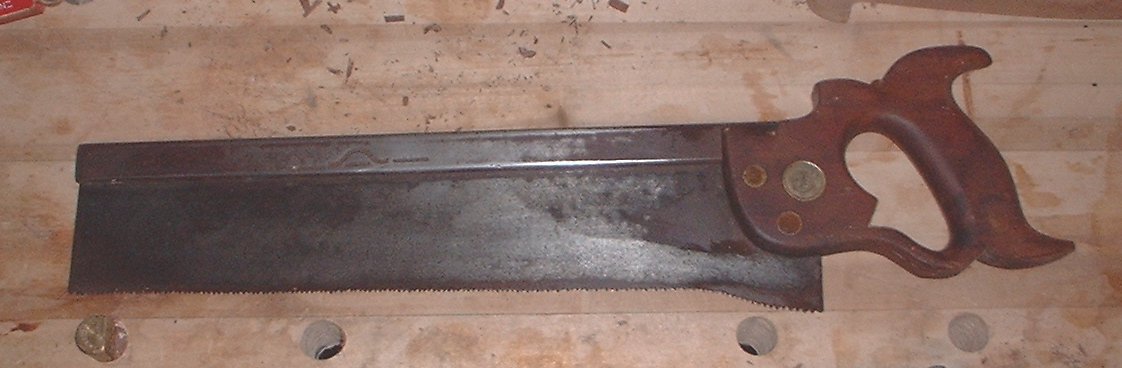
A "Henry Disston & Son" 14-inch backsaw. This logo was only used around the time
of the U.S. Civil War. The bulge under the handle is a result of improper
sharpening.
The smaller backsaws are quite useful in cabinet work. If you only have space or money for one, a twelve inch saw with about 14 points is a good general purpose solution. Backsaws almost always have more points than handsaws, as they are made for finer work. Also, the thin steel blade would not work very well with large coarse teeth. Firstly, they would take up too much depth; saw teeth being triangular, wider tooth spacing means greater tooth depth. Secondly, it is unlikely that the thin steel of a backsaw could support the stress on a big tooth. It would likely bend and be damaged. In fact, the smaller the backsaw, the more points are typically observed. An eight inch backsaw would often be made with 16 points, while a 16 inch backsaw would probably have about 12.
Longer backsaws have good use in cabinetmaking as well, but beyond a certain point (say, 20 inches) you are discussing saws not meant for freehand use but rather intended for use in a miter box. Such saws were available in lengths up to 30 or 32 inches, and depths up to about six inches.
 Dovetail
saws are a bit of a special case. Not only are they usually small (eight or ten
inches in length), fine (15 points or more) and filed rip, but they are made
with thinner steel than other backsaws. Making dovetails is precision work, and
the smallest kerf allows for very smooth sides. It is also the case that
dovetail saws have very little set, sometimes none or as close to it as
possible. Again, this produces a very small kerf, but the user should be aware
that the cut must be perfectly aligned or nearly so, as a saw with no set does
not allow for changing direction mid-cut if you suddenly notice you have
wandered from the intended line. Of course, in some applications there is no
real need for mechanical precision in dovetail joinery - as when a rustic look
is desired. If you want your dovetails to be uniform in size and angle, a bit of
set may be of some help when you are starting out in learning to hand cut this
joint. We all make mistakes while learning.
Dovetail
saws are a bit of a special case. Not only are they usually small (eight or ten
inches in length), fine (15 points or more) and filed rip, but they are made
with thinner steel than other backsaws. Making dovetails is precision work, and
the smallest kerf allows for very smooth sides. It is also the case that
dovetail saws have very little set, sometimes none or as close to it as
possible. Again, this produces a very small kerf, but the user should be aware
that the cut must be perfectly aligned or nearly so, as a saw with no set does
not allow for changing direction mid-cut if you suddenly notice you have
wandered from the intended line. Of course, in some applications there is no
real need for mechanical precision in dovetail joinery - as when a rustic look
is desired. If you want your dovetails to be uniform in size and angle, a bit of
set may be of some help when you are starting out in learning to hand cut this
joint. We all make mistakes while learning.
The saws discussed so far have all been frameless - they have a single handle and the blade is either unsupported or supported on only one side in the case of backsaws. There is a whole other group of saws that are used in woodworking that consist of a frame (usually rectangular or almost so) and a single blade held by the frame. In fact, these are probably the first saws ever used, as older descriptions of woodworking tools focus on their use to do many jobs. Only when steel technology was sufficiently advanced to produce larger saw blades with uniform characteristics did handsaws and backsaws start to take over. With a frame saw, only a small amount of steel is needed and it is held under tension by a wooden frame, a somewhat easier design to produce.
There are, of course, modern saws with metal frames - the hacksaw, coping saw, and fret saw are all examples of a metal frame holding a smaller linear blade. At least the coping saw had a wooden predecessor in the turning saw.
 Just
as with handsaws and backsaws, frame saws may be found with rip or crosscut
teeth. Most are crosscut saws, but there is a class of saws called frame resaws
that are always filed rip. These are used, as the name suggests, for making a
board thinner. These are typically two-handed saws with large frames and a
centrally located blade. Think of this saw as a large picture frame, with the
blade running in the middle of the longer direction. If you set the saw down on
the bench, the teeth would point straight down (or up, if you like to live
dangerously). In use, one clamps a board to be resawn in the vise and saws
through it, alternating sides from time to time. Frame resaws are unexpectedly
easy to steer if you find yourself cutting away from the desired line. Frame
resaws are not commonly found, and many are shop made. But they are very useful
tools.
Just
as with handsaws and backsaws, frame saws may be found with rip or crosscut
teeth. Most are crosscut saws, but there is a class of saws called frame resaws
that are always filed rip. These are used, as the name suggests, for making a
board thinner. These are typically two-handed saws with large frames and a
centrally located blade. Think of this saw as a large picture frame, with the
blade running in the middle of the longer direction. If you set the saw down on
the bench, the teeth would point straight down (or up, if you like to live
dangerously). In use, one clamps a board to be resawn in the vise and saws
through it, alternating sides from time to time. Frame resaws are unexpectedly
easy to steer if you find yourself cutting away from the desired line. Frame
resaws are not commonly found, and many are shop made. But they are very useful
tools.
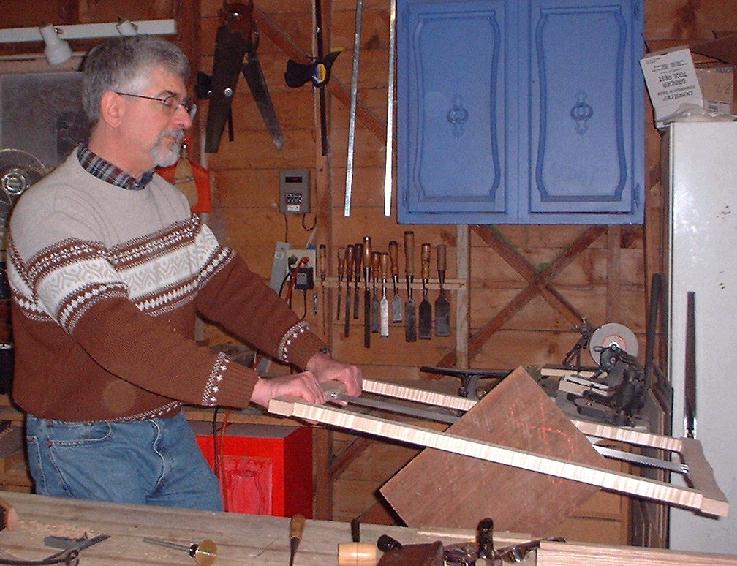
Unlike the frame resaw, the bowsaw is a crosscut saw with the blade forming one of the long sides of a rectangle, a central stretcher that provides some pivot capability, and a tensioner (string, typically) on the opposite side from the blade. Tightening the string puts tension on the blade, allowing the saw to function. Many bowsaws are also shop made, but they are quite common. For many years these were the saw of choice in Europe, and many examples still exist.
If you only want to look at your saws, then you don't need to keep them in condition fit for use. Since most of us acquire saws for the purpose of cutting wood, it becomes useful to know how to maintain them so that they will work well for that purpose. In the old days, this was seldom necessary, as every town had someone who sharpened saws. A worker who used his saw on the job every day would acquire skill in this area, and probably sharpen his saws at the end of the day in preparation for the next day's work. But a homeowner or other occasional user would simply bring his saw down to the saw shop when it became dull from use. For a few dollars (or maybe less), it would be returned in good condition. Thus, the "gentleman woodworker" would not know how to sharpen his own saws. The advent of power tools made it less likely that this knowledge would be preserved, however. People stopped using handsaws for construction, and thus there was no need to have knowledge of how to sharpen them. Over time, people who once knew how to perform this task died off, and no one took the time to learn from them before it was too late. The knowledge is not completely lost, as some of us have acquired it in modern times, but it is a bit harder and takes a good deal of research - not to mention practice - to learn this skill on your own. I teach others what I have learned from time to time. Some of this knowledge is included in this section.
Of course, the first step is to understand what you are trying to accomplish. Generally, I only deal with saws that are in reasonable shape and just need to be sharpened. But there are certainly saws in the world that are in such bad condition that all the teeth should be removed and new teeth cut. The easiest way to do this is with a professional saw-cutting machine. Most are made by Foley. They are no longer made for handsaws, but there are many still in existence. If you have a saw that is a disaster, or if you wish to change the tooth pattern (specifically the pitch, or teeth per inch), it would be best to seek someone with a machine to do so. Of course, anything is possible to accomplish by hand. Saw sharpening machines did not always exist. It just takes more time and care to create the teeth from scratch with a pattern and a file.
If the pitch of the saw is appropriate to your desired use, then you can skip the retoothing and move on to the sharpening itself. This is a good time to review tooth shape, above, and to make sure you know how you want to use the saw. Now is the time to consider the geometry of the saw teeth.
The performance of a saw is somewhat optimized by choosing the correct angles when sharpening. Rip saws are relatively simple, since they are filed straight across, giving them a flat leading edge. However, you still need to worry about the angle of the leading edge of each tooth in relation to the line of teeth itself, called the rake angle. In comparison to an unsharpened rip saw, just filing the teeth at 90 degrees to the edge of the saw will be a considerable improvement. In such a case, the saw file will be held with one of its faces vertical and pushed straight across the leading edge of the tooth. However, depending on the kind of work you are doing, it may be useful to “tune” this slightly by making the tooth leading edge “lean back” a few degrees. Not much is required for ripping, but being consistent in this regard requires either a great deal of practice or a little mechanical assistance in the form of a guide or gauge (the latter is preferable). All kinds of rake are possible, including negative rake, wherein the tooth actually leans forward a bit. But a small amount of positive rake - say, five degrees - helps make the saw easier to start. I always sharpen rip saws this way.
Since crosscut saws are sharpened with knife edges, there are many more angles to worry about. Instead of filing with the cutting edge of the file almost vertical, you want to file with the non-cutting side of the file (two out of three file surfaces actually cut on each stroke) almost horizontal. If the top of the file is horizontal, this results in a nominal 30 degree rake angle, acceptable for a cross cut saw. But as always, some tuning of this angle to fit the job at hand can improve performance considerably. Few saws would be sharpened with the leading and trailing edge at the same angle, as this would cut very slowly. Instead, a more aggressive cut is chosen by making the leading edge steeper and the trailing edge shallower (they still have to add up to 60 degrees).
That determines the tooth profile as viewed from the side, but not the angle of the faces of each tooth. To set this, you don’t file a crosscut saw at 90 degrees to the saw blade but at an angle closer to 60 degrees. This angle produces the bevel, and is called the fleam angle. And finally, the handle of the file may be held down slightly so that you are filing “uphill” to achieve the proper tooth shape. Clearly, you need to be thinking about holding the saw file properly in a three dimensional space (pitch, yaw, and roll) when sharpening a cross cut. It is just more complicated due to the complexity of the tooth shape. Note that rip saws usually are filed straight across with no fleam angle, just rake. But some people prefer a bit of fleam angle even on rip saws, as it makes the saw easier to start. This is largely a matter of personal preference, not being right or wrong. If you do add a bevel to the front of rip teeth, it will probably be only a small amount.
Once you have determined the type of tooth you want and have studied the angles, it's time to pick up your saw sharpening tools and get started. Wait - you don't have any saw sharpening tools? Well, you probably do, but not nearly enough. Happily, they are relatively inexpensive and easy enough to come by.
Since much of the work involved in saw sharpening involves filing teeth (either for shaping or for putting the bevel on), the triangular file is your primary tool. These come in various lengths and tapers, and there are tables available to show you what the right size for your saw is. There is probably little reason to try to get a complete set, but when you get a new saw you should check to see if you have the correct size file for it. If not, you might as well acquire one, as you will need it eventually. Files do wear out, so it is sometimes useful to keep more than one on hand. I have a lot of eight point crosscut saws, which call for a 6 inch slim taper file. I have more than one file in this size. I normally use five file types, although I would acquire an additional size if I really needed one. It all depends on your saw inventory.
| File size | Saw Points |
| 4 inch Extra slim taper | 15-20 |
| 5 inch Extra slim taper | 12-14 |
| 6 inch Extra slim taper | 9-11 |
| 6 inch slim taper | 7-8 |
| 7 inch slim taper | 4-6 |
You can get files in all the usual places. They are common as dirt at yard sales and flea markets, but don’t buy one that looks pretty much worn out, even for a quarter. New ones are available from Sears (who carries Simonds files as their own brand) – make sure you get the ones with the black tangs. Or, you can buy them from Pete Taran, who has a much more complete selection. Pete sells Sandvik files these days. Some of my files are Nicholsons from Ace Hardware, which seem OK too. The people who stock these things know little about their intended use, and often mix them on the same display hook. Read the package carefully, or order by mail from a reliable source.
One question that comes up from time to time is – why not just use one file for all sized saws? After all, an equilateral triangle is the same in any file size. There are three reasons why you should choose the correct file size.
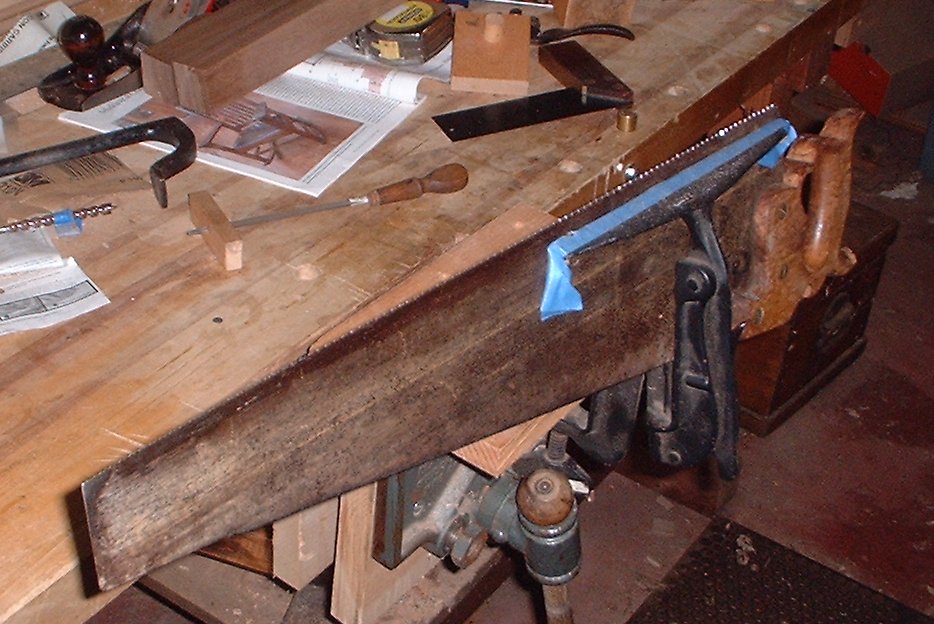
I list this second because I think it is the next thing you need. It’s a real epiphany to use one for the first time. But you can start without one, creating a sandwich of saw filling with wood on either side, clamped in a vise. It just doesn’t work nearly as well. Or, you can make your own, in which case you would probably try to make it as wide as possible, say two feet. This can then be clamped in your end vise. Or just try to find one at a yard sale for $5 like I did. I see them frequently, and most people don’t even know what they are. The blue painter's tape seems to help reduce vibration, and is a definite help in avoiding scratching the saw if it should slip in the vise. But with the tape, it won't slip at all. I prefer a vise that tilts, so that I can hold the file level and still impart a slight upward angle to the stroke as I was taught to do on crosscut saws.
This saw vise is attached to an inverted L-shaped block of wood. The downward "tail" of the L is a 2 x 4 that gets clamped in the bench vise in use. In this way, I don't have to attach and detach the vise itself using its built-in thumbscrew every time. This is much faster and does not require you to find a spot on your bench to attach the saw vise.
There are a number of reasons why you want a good saw vise, especially one with a built in tilt setting like mine.
 Got
a flat mill file? Got a 2 x 4? Make your own. See what mine looks like?
Basically, it's just a file holder. You can buy one if you like, but it isn’t
going to work much better. You don’t need to joint the saw every time; but I
usually joint any saw that I am sharpening unless I’m just doing a quick
touch-up. It takes almost no time and results in a better job. By flattening the
tops of the teeth and then filing just until they come to a point, you are far
more likely to end up with a saw that has teeth that are even.
Got
a flat mill file? Got a 2 x 4? Make your own. See what mine looks like?
Basically, it's just a file holder. You can buy one if you like, but it isn’t
going to work much better. You don’t need to joint the saw every time; but I
usually joint any saw that I am sharpening unless I’m just doing a quick
touch-up. It takes almost no time and results in a better job. By flattening the
tops of the teeth and then filing just until they come to a point, you are far
more likely to end up with a saw that has teeth that are even.
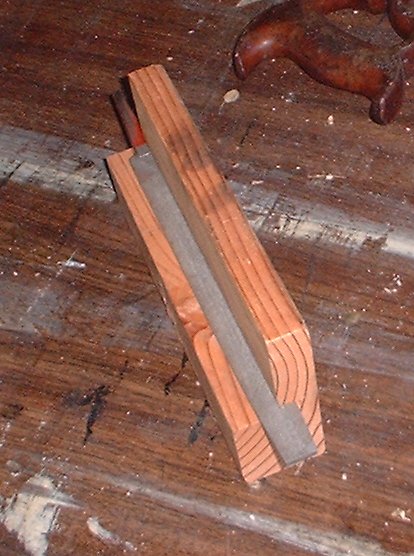
This saw jointer was made from a section of a 2 x 4 with 1/4 of the material removed as a large rabbet. A slot just over the thickness of an eight inch mill bastard file was cut in the remaining long side - you can figure out where the slot is from the picture. In use, this is held upside down with the long side of the rabbet held against the saw blade. Then you slide the block and file along the saw blade until all the teeth have a slight flat in them.
It also works for scrapers.
There are dozens of variants of these that were invented by someone. The best is the Stanley 42X. I got mine at a yard sale for $5, and it works fine. Others can be used pretty well, but the double plunger action of the 42X (first grab the saw, then push the tooth) is hard to beat.
In addition to the above saw jointer, there are a number of helpful gauges that can be made from scraps of wood. These are not strictly necessary, but since they cost nothing but your time, it is well worth your effort to make them. The design of these was learned from Pete Taran, of www.vintagesaws.com. I recommend a visit to his web site if you want to acquire some in-depth knowledge. The article on saw sharpening has instructions on how to make the gauges.
These gauges go on the end of the saw file opposite the handle and give you an ongoing hint as to what rake angle you are creating. They are more necessary when shaping teeth than when pointing them, since the file will tend to follow the existing rake angle when you are doing the latter step. However, it does not hurt to use one, and it is sometimes an advantage to be able to grip both ends of a file. You need one for each combination of file size and rake angle that you wish to use. In practice, several saw files can share the same rake gauge as they are not that different in diameter. The rake gauge allows you to keep the edge of the file at a constant angle with respect to the line of saw teeth, thus determining the angle of the front edge of each tooth. It keeps you from "rolling" the file to the wrong position by giving you a clear visual reference. So long as the top of the gauge is parallel to the benchtop (or other horizontal reference), the proper angle of the file will be maintained. If you should rotate the file handle to the wrong position, it will be obvious because the block of wood will no longer be horizontal.
While the Rake gauge monitors “roll,” the Fleam gauge monitors “yaw.” You use this gauge to maintain consistency in the bevel (or fleam) angle you put on each tooth. You don’t need this for rip saws, of course, since their fleam angle is zero. Basically, this is a stick that sits on top of the saw and establishes a line to which you want file parallel. It has a slot cut in the bottom so it can be moved up and down theline of teeth to a comfortable position for establishing a visual reference.
Leonard Lee says to joint saws every time you sharpen since you are going to recreate the bevel anyway. If the saw was out of joint, this will fix it, and if it wasn’t you have not lost anything. Since saw jointing essentially costs nothing in the way of new equipment, you might as well try it. At very least, hold the saw teeth against a flat surface and see if they contact the surface evenly. If not, joint the saw before doing anything else. If they are pretty much even, you are probably safe to just move on to pointing (or filing) the teeth, unless the teeth are really misshapen, in which case joint first anyway.
Just remember that if the teeth have all been jointed so that the tips are all even but slightly flattened on top, when you file the teeth so that each tooth just comes to a point you will have also created equal sized gullets. The only way to achieve this is really by jointing the saw.
Most of the time, you won’t need to completely shape saw teeth. The exceptions are if you have really messed up a previous sharpening job, or you just bought a saw from someone who really messed up a previous sharpening job. (Possibly, you deliberately want to change the shape of the saw teeth, in which case this step also needs to be done.) You can tell if the teeth are wildly uneven in size (The Brits call this cows and calves) or just horribly misshapen. Too bad, but you will have work to do. The first thing you need to do is make them all the same height by jointing the saw properly.
You are now going to make triangular teeth at the proper rake angle. For rip saws, this is 0 to eight degrees – I like 5. For cross cuts, you want something like 15 degrees for a fairly aggressive cut. If for some reason you don’t feel aggressive, increase the angle. Make a gauge to help you in this step. You’ll need it
Even for crosscuts, you will shape the teeth by filing all of them from the same side and straight across the saw. You are not worrying about fleam angles yet, just the proper shape. This can easily be accomplished by just filing them all in the same direction with a rake gauge. Once you have them shaped properly and all the same height, then you get to worry about setting the bevel angle on your crosscut saw.
Of course, most saws you sharpen will only need this done once, because they only go “out of shape” if you mess up a sharpening job. Once you’ve got it right, touching up the sharpening job will keep the saw in good shape without reshaping the teeth.
I am using Leonard Lee’s terminology here; Pete Taran calls it Filing. It’s hard to pick a good term, since several steps use files and all of them make points as an end result. By pointing, I mean putting the bevels on the teeth (or, if they are already there, making them better.)
For a rip saw, this is really very similar to shaping the teeth. Once you have made the teeth be the proper shape, you are pretty much done, since rip teeth are filed straight across. When I sharpen a rip saw, I still tend to sharpen every alternate tooth from the same side of the saw, just because I was taught to do it this way. Of course, if you want to put a small amount of fleam on rip saw teeth, you will follow the same procedure as you would for a crosscut saw, just with a lower angle.
For crosscut teeth, pointing is the hard part. You want to simultaneously put a bevel on the leading edge of one tooth and a bevel on the trailing edge of its neighbor. (Trust me, you can’t help it, it just happens.) Of course, the leading edge is the important one. But the angle of the bevel is critical, you don’t want to lose the rake angle, and you want to maintain proper “60 degree geometry” by sharpening up towards the tip of the tooth. Thus, the pitch, roll and yaw problem.
The rake gauge should still be used in this step, which takes care of roll. Keep it horizontal and you won’t have any problems. You now get to use the fleam gauge you made above to track yaw. It determines the bevel or fleam angle you are putting on the tooth.
And you want to lower the handle slightly (in the pitch axis) to maintain geometry. This is most easily done if you have a tilting saw vise, since you just set the vise to the desired angle and keep the file level. If you don’t have such a vise, you will need to lower the hand holding the file handle slightly to keep the file in contact with the tooth at the correct angle. In a geometrically-perfect world, you would drop the handle the same amount as the fleam angle (i.e., 20 or 25 degrees), but there are two reasons not to do this. First, it’s pretty uncomfortable to sharpen a saw this way. Second, this actually weakens the tooth slightly. So you are better off just adding a small amount of tilt. I tilt the saw vise about ten degrees. But you don’t lose much if you just file straight across. This is not a critical dimension.
There’s an old saying that if you start out doing things the right way, you never have to “unlearn” them later on. We’re going to use this as a mnemonic device, because you start out with everything “right” when you sharpen a crosscut saw.
You are going to be sharpening from the heel to the toe, so align the saw with the teeth nearest to the handle clamped securely in the vise. In addition to sharpening the teeth from the handle to the toe, you are also going to be angling the file from the handle to the toe (i.e., with the file handle closer to the saw handle, easy enough to remember). As you push the file forward, you will be moving towards the toe. Very consistent.
Well, perhaps we should stop and make sure we are on the correct teeth first….
If you have a saw that already has bevels on the teeth and they were done correctly, it’s sort of obvious which side of which tooth gets filed. You’re not going to put a bevel on both the left and right side of the same tooth. But if you just reshaped the saw teeth, there won’t be bevels in place. It’s pretty likely there will be set, though, and you can use this as the real guideline. In fact, if I have a saw that has no set at all but will be set later, I will add the set now so I can use it to guide me in pointing the teeth. I once was handed a saw to sharpen that was set incorrectly. Somewhere in the middle of the saw, a tooth was skipped in setting so it was not consistent from handle to toe in having every other tooth "back" and the intermediate ones "forward." This was so confusing I had to reset the saw before I could continue sharpening it.
Start at the right end of the saw (nearest the handle) and examine the first few teeth. There are two gullets (the low point between the teeth) of interest, the one between the first and second tooth and the one between the second and third tooth. In one case (and only one case), the tooth to your right will be leaning away from you and the tooth to your left will be leaning towards you. Put the tip of the file in that gullet before you forget which one it was, because that’s the one you want to start with. You want to make sure you’re in the correct place right away – uh oh, another mnemonic.
Make sure the rake guide is parallel to the teeth and the file is angled so as to be in parallel with the fleam guide. The tip of the file should be pointing towards the tip of the saw and the file handle towards the saw handle. Push the file forward. You will be cutting a bevel on the leading edge of the tooth on your right and the trailing edge of the tooth on your left. Note that the bevels are sort of on the inside of the teeth, if it helps you remember. If the tooth is leaning away from you, you put a bevel on the side towards you, and the next tooth (leaning towards you) gets a bevel on the side away from you.
You are now going to sharpen the tooth “just enough”. Well, that’s a bit confusing, since I haven’t said how much that is. Remember that when you jointed the saw, you made the top of each tooth slightly flat. What you are going to do now is file the tooth until the flat top just disappears, and the tooth just comes to a point. How will you know? No easy way out of this, you just have to look at the tooth as you sharpen it to know when to stop. It’s fairly likely that no two adjoining teeth are going to require exactly the same number of strokes. Sorry, you just have to get close to the saw and watch how each tooth is coming along.
When you have finished the first tooth, move to your left, skipping a gullet. You are going to sharpen every other tooth from this direction. The ability to count to two is a critical skill for saw sharpeners. When in doubt, back up and check you are in the right place. It’s hard to recover from this kind of error. Luckily, the teeth you have just sharpened are going to be blindingly bright compared to the others, and it should not be difficult to figure out where you were. Common sense does not hurt here, either. You can see the bevels on the teeth leaning away from you, but not on the teeth leaning towards you, since you are looking at their flat (unsharpened) outsides.
Eventually, you will move to the left enough to have to move the saw in the vise. You don’t want to be sharpening teeth in mid-air, so you will probably have to move the saw once or twice unless you have a really big saw vise.
When you get to the end, you no longer have to worry so much about doing things right, but just about doing the side that’s left. (Don’t you just hate mnemonics?) Put the saw in the vise with the handle to the left. Remove the rake guide from the file and reverse it so the line leaning to the left is visible as you file. Pull the fleam guide off the file, reverse it (the top stays the same, but the file goes into the hole from the other side) and place it on the file so that the line leaning to the left is visible.
Now find the gullet that you did not start on last time (remember , there were two choices). The tooth leaning away from you will be on the left. Start filing there, making sure that you are again filing a bevel on the inside of the tooth. Move from left to right this time, as always from the heel to the toe of the saw and filing heel to toe.
When you are done, you might stone the outside of the saw slightly to remove any burrs. Some people feel this is not a good idea, as it does not leave a sharp corner on each tooth when done. One approach is to try out the saw and see if it pulls to one side or the other. Only stone it if this happens. Just using the saw on some hardwood is often enough to remove any small burrs you might have produced.
Setting a saw is a relatively simple operation, assuming you’re not going to do this with a saw wrest but are instead going to be using a Stanley 42X or some other setting tool. You are trying to achieve a set of about 20% more than the thickness of the saw blade itself. Be conservative, since most decent saws are taper ground (thicker at the teeth) and don’t require very much set as a result. It’s easier to add more set than to take it away, so that’s yet another reason to be conservative. You should strive for consistency more than anything. You will know it if your saw does not have enough set, since it will bind. If you have too much set, the saw will be hard to push, although you might attribute this to other causes. You achieve consistency by always applying the same amount of pressure at the same point. That point for a crosscut saw is about where the bevels meet. For a rip saw, it’s the same place except you have to imagine the bevels, since they aren’t there. Just a bit down from the point, in other words. Other than that, this is a forgiving operation. It does not matter where you start, or whether you move left to right or right to left. Just try real hard to only push on teeth that are already bent away from you.
Saw teeth do break. Sometimes you hit a nail or other obstacle in the wood and the saw loses the battle. Other times, saws just seem to become more brittle and a tooth can snap off in use (or worse, when sharpening). A missing tooth in a saw is not a tragedy. It will still work, and it will come back as if by magic as you sharpen the saw a few times - if you are careful. Only if you are missing a lot of teeth should you consider filing them all off and starting over – and if you do, you might want to consider finding someone with a Foley retoothing machine. Of course, it is possible to create a complete new set of teeth just using a file if you are careful and have a lot of time.
The tradeoff you need to consider is that removing all the teeth and starting over will remove a lot of metal. It’s the equivalent of quite a few sharpenings, and if the saw is already thin from years of use, you may not want to remove that much metal. I tend to avoid all the work involved if there’s only one tooth missing (very common) or there are a few missing teeth and they are not right next to each other.
If you want to simply lay the groundwork for the tooth’s reappearance, then just sharpen the saw as normal until you come to the missing tooth. Then very carefully file down into the gullets around it. Make sure the adjoining good teeth have the proper shape. Then you may choose to manipulate the saw file angle manually to create a small point on the broken tooth. I believe this may help further deterioration of the shape from fracturing the edge. On fine backsaws I don't usually do even this much. The teeth are so small that they generally will reappear in about two sharpenings.