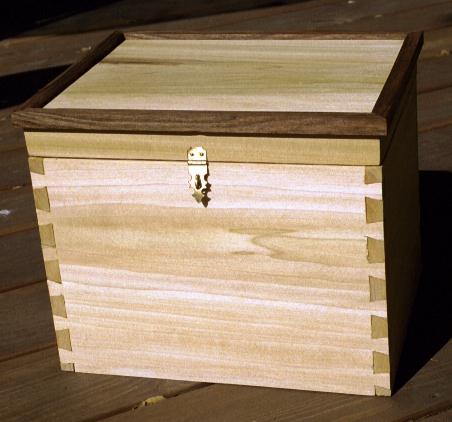
After an unreasonably long time on my projects list, I finally got around to building a necessary piece of tool storage - a box for my Stanley #45 combination plane and its assorted parts. While the plane undoubtedly came with a box of some sort, it was lost some time between the end of the 19th century and the present day. These planes came with a wide variety of boxes over the years, from "box jointed" wooden ones to simple cardboard boxes. Some have survived, but it was also traditional for the owners of these planes to build their own boxes.
There are a number of decisions to be made when designing such a container, including how big you want it to be. I consulted with local galoot Tom Holloway, who built a box for his plane. Tom designed it so as to be large enough to store the plane with the long rods installed. This plane came originally with only long rods, which take up a good bit of space. I acquired a set of short rods from Stan Faullin a while back and find that these are probably going to be used much more. Thus, the first decision was to design the box to accept the plane with short rods only, and to provide storage for the long rods. It doesn't take that long to swap them in when needed.
Once I knew the overall dimensions, I thought a bit about wood. A late 19th century woodworker would have probably used whatever wood was commonly laying about as leftovers from projects, and I decided to do much the same. Alas, I did not have anything as wide as I needed, so chose yellow poplar as an easily workable wood available at a low cost. It is a very soft hardwood, with tones of green and brown that you either love or hate. My benchtop is made of it, and it is readily available in the width I needed. I could have gone with pine (a bit soft for my taste but traditional) or a fancier hardwood. But this is supposed to be utilitarian, not designed to impress anyone. We are storing a tool here, not jewelry.
The construction techniques are pretty straightforward. Dovetails are a given since I am woefully in need of more practice. Poplar is soft enough to be forgiving of mistakes, and an easy wood in which to cut dovetails. Another tradition is to use the #45 in construction, so I decided to run a groove around the inside near the base to allow the floor to float. The floor itself is rabbetted to leave only a tongue all around that floats in the groove in the four sides, allowing plenty of room for wood movement. The top left a few design choices open. However, a quick check indicated that if the bottom of the long rods were to sit on the top of the floor, then I needed a little more room than a flush mounted top would provide. Not a problem - I decided to bevel the underside of the top at 45 degrees, then make a rectangle the same size as the sides but only about an inch tall. This would extend the sides another inch or so. By beveling the inside top of this at 45 degrees to match the bevel on the flat top, I would create an inverted "tray-like" assembly that would be the top. The outside of the "real" sides would be rabbetted on the outside, and the inside of the top would be rabbetted as well so it would close over the sides. The bevel at the joints between the side extensions and the actual top would prevent seeing any end grain.
OK, that was the theory.
In practice, I never could get the side extensions and the top to look right together. As so often happens, I passed the point of no return, beyond which everything I tried just made things worse. So I did what any galoot would do - I found a way to hide my mistakes.
I had a lot of small walnut pieces around, cutoffs from an earlier project and basically scrap from my brother-in-law's woodpile. He lives in Santa Rosa, CA, where there is a gunstock maker that produces phenomenal amounts of walnut waste every week. We are talking about a pile larger than a house, here. They sell it by the truckload as firewood, and that's what my BIL burns. I liberated a few good pieces as my price for helping load the pickup, and I have many small scraps when needed - as we shall soon see. Basically, I cleaned up - OK, hid - my mess by cutting four strips of walnut and rabbetting out an inside corner of each. I then fitted these to form an oversized square that would fit over the bad joinery on the top, as seen here.
So now I had an outside, but there were still many decisions to make about the inside. There was the plane itself, which needed to be held in place enough so that it would not move too much in transit. There are all the cutters to consider - I have an almost complete set and a couple of extras. Then there are some accessories, like the beading stop. This is not used much, but still needs to be stored. One of my purposes was to avoid random pieces scattered about the shop with the potential to get lost. Oh, and there were the spare set of rods to store, as well.
I started by just putting the plane in the box and trying various scraps of wood around it to see what they would do. I ended up gluing a strip of walnut to the side so that the ends of the short rods hook underneath it; the skate of the plane is towards the center of the box. That held it from tipping but not sliding away from the wall with the glued on walnut strip, so I made two walnut sticks and some poplar blocks with cutouts. The blocks took about a minute to make - two saw cuts and a bit of chisel work and I had a U-shaped block of wood with a hole the size of my sticks. The blocks were glued to the sides of the box in locations such that the sticks would secure the plane when dropped through the holes. To remove the planes, you just pull out the sticks and the plane can be slid away from the wall. The whole thing looks like this.
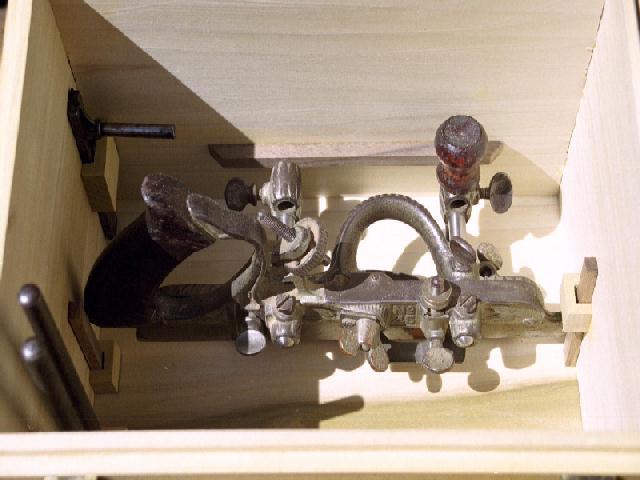
You can also see the beading stop in another U-shaped poplar block in the upper left corner. The plane actually sits towards the front of the box - this picture is from the back. A higher block on the left hand "stick" may be a useful improvement. You can also see how the top edge of the sides is rabbetted so the cover can close over them.
Now, what about all those cutters? I figured out that a small removable box the length of the inside of the big box would work pretty well. Other than the really unusual ones, they can mostly fit in - certainly all the beading cutters; I have a complete set of those. I have almost all the plow cutters, and those can be easily made if I need one and have not found it yet. The cutter box is really just a sandwich of two thin boards with some spacers at the ends and one in the middle. A separate base is glued on and the cutters just drop in. My first prototype was poplar and walnut, but this was a seriously green piece of poplar and was just really ugly with the walnut. Really, really ugly. I could barely stand to look at it on my bench, much less as part of something I was building. Unfortunately, this was about the only piece of scrap poplar I had around that was long enough and wide enough. So, back to the scrap box. I eventually came up with a piece of curly maple that had been partially resawn. Throw it in the vise, grab my Disston 112 rip saw, and finish that job. A little planing and I have two pieces of wood that don't make you sick when you see them together. A few small poplar scraps for the rest of it (these don't show much) and I glue it up. My wife insists that it needs a little walnut handle, so it gets one.
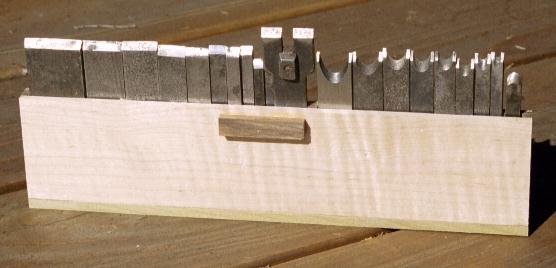
OK, this has to go in the box. But the shop is not out of little walnut strips by a long shot, so I glue in two more in such a way that the cutter box is held in place until you grab the little walnut knob and slide it up to clear its retaining strips. Not easy and you need to be careful, but it works. It's harder to get in than out - cut it a little close there, only about 1/16 inch of clearance.
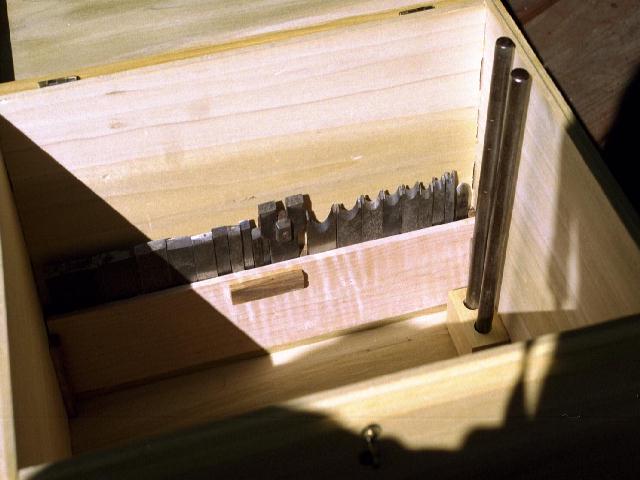
OK, it's getting pretty late here as the shadows are on the deck, but you get the idea. You can also see how the spare rods sit in their little block. One of the walnut strips that holds the cutter box is peeking out from behind the rods; these are glued to the sides with a tiny amount of space between them and the cutter box.
The box is finished in a few coats of orange (I think) Paddy-lac that was still hanging around in the shop. I was not trying for a furniture-grade finish here, as this will live under the bench and get banged around a bit. The hinges and hasp are antique brass from Lee Valley. I still need some suitable handles for the sides, as this thing is heavy. I just have not found any I like yet, but they will turn up. I still have a few problems to solve, like what to do with the cam other than just throw it in the box. I'm working on it. There may be another little box inside for miscellaneous pieces, although I don't quite know where it will go and how it will be secured at this point.
There are plenty of flaws here, especially in the dovetails that were done when I was really tired. This is the unfortunate aspect of woodworking in five-minute spurts as I often am forced to do. But it's one more thing off my project list. And my scrap pile is visibly smaller as a result of this and a few other projects.